If you are considering not bothering to read this post because you don't even know WHY I would want to bake my own bread...read THIS...it explains why homemade wheat bread is so good tastin' and good for you.
This post is EXTREMELY long. It contains the recipe and instructions for the bread that I make at home from scratch. The original recipe is at www.yourhealthsource.org. My recipe for Whole Wheat Bread is tweaked a bit from the original.
Before you even read further, know that I have a posted a simple recipe for baking bread by hand too (yield = 2 loaves). Please don't be discouraged from trying. I'm just an information junkie and want to share as much as I can...
Bread making doesn't have to be difficult. Any 'ol recipe book will give you a good start. When I decided to try making bread I picked up the red-and-white checkered Better Homes and Garden Cookbook and made homemade white bread. It was very good. Then I made wheat bread from the recipe on the back of the whole wheat flour package bought from WalMart. It was tasty too.
I started making bread three years ago and I'm still learning. Life is a journey; so is making bread :)
The first recipe assumes you are milling your own wheat into flour and using a Bosch Universal Mixer. If you don't have the equipment to mill your flour, start with the flour from the store or find someone near you who DOES mill their flour. Further down you will find the recipe for making bread by hand. This bread is GOOD and yield 6 loaves. It's the same bread I use to make cinnamon rolls!
WHOLE WHEAT BREAD
You will be delighted with how simple bread making can become. Bread can be ready to eat in as little as 1 ½ hours!
12 cups wheat berries
2/3 cup olive oil
2/3 cup honey (Sometimes mine ends up being a cup :)
6 cups warm water (120 to 130 degrees)
(I use 5 cups of water and 1 cup of STARTER)
3 tablespoons yeast
2 tablespoon salt
Makes 6 loaves
Preparation time: 30 minutes
Rising and cooking time: 40 minutes
1. Using the mill, grind 12 cups of hard Prairie Gold Montana Wheat (important to have high quality, triple washed, certified chemical free wheat-this is the safest for your mill and is grown for human consumption, with plenty of protein) (12 cups of wheat berries= approximately 18-20 cups of flour)
2. In Bosch™ bowl, use the Dough Hooks to mix the honey, oil, water, and yeast. Be sure the plastic splash guard is on the mixing bowl.
3. While running the mixture at low speed, add 10 cups of flour and then the salt.
4. Stop the machine and set a timer. (10-15 minutes in the winter-10 minutes in the summer) Put the lid on the bowl to capture the moisture and warmth of the mixture. Let sit until timer goes off or until dough rises almost to the top of the bowl. This is called letting the dough "sponge."
5. Turn the machine on 1 and continue adding flour until the dough clears the sides of the bowl.
6. Knead on a low speed for 4 to 5 minutes. Let the dough sit for 1 to 2 minutes, then check for gluten development. (see Tips & Techniques) The dough should stick to itself, not to you.
1. Press the dough and it will spring back.
2. Dough clings to itself and not you.
3. Dough is translucent when stretched, you can see light through it.
7. This is the fun part! Take the dough out of the bowl by dumping it onto an oiled countertop or large cutting board. (no need to add flour from this point forward) Pick the dough up and slam it down a few times. Slamming the dough helps remove any air bubbles that may have formed. Simply dump the dough and then shape it into a large circle. Using regular kitchen scissors, cut the dough (like a pie) into 6 equal pieces. Each of these pieces of dough can now be used to make a variety of bread forms. (use a kitchen scale to weigh the dough if you want 6 perfectly equal parts) Some of the possibilities are: loaf of bread, cinnamon rolls, foccaccia bread, bread sticks, dinner rolls, pretzels, tea rings, hoagie buns, filled breads/buns, sandwich bread, 3 ball dinner rolls, crescents, pizza crust, sticky balls/monkey bread, cinnamon twists, herb/garlic bread, braided breads, etc. See instructions below for shaping the dough.
8. Shape into the desired form and let rise in a warm oven for about 20 minutes or on the counter for 1 hour, OR until the bread doubles in size.
9. Bake at 350 degrees. If your bread is rising in the oven, simply turn on your oven and let it preheat with the bread already inside. You may want to experiment with taking the dough out of the oven and letting the oven get to the full 350 degrees and then put the dough back in. I like to just turn on the oven without removing the dough because it saves me a few steps.
10. Get to know your oven. . .rolls and pizza crust take less time, loaf bread takes up to 30 minutes in some ovens. I usually bake rolls for 15 minutes (or less) and bread for 20 to 25 minutes.
SHAPING THE DOUGH
After forming the dough into the shape of a large circle. Cut the dough into 6 equal pieces. Now you have the beginnings of a variety of bread forms. 1/6 can become any of the following forms, or any you can dream up! Set aside 5 portions of dough and cover with moist cloth.
LOAF OF BREAD, simply take 1/6 of the dough and shape it into a long, narrow loaf and place into a prepared (oiled) bread pan. Pat down any remaining air bubbles.
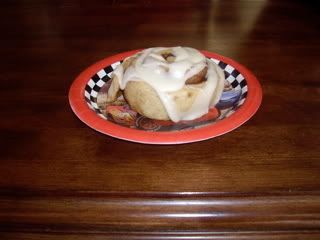
CINNAMON ROLLS, simply roll dough out into a rectangle shape, (at least 10 by 14 inches) then add your favorite ingredients. If you want extra fluffy cinnamon rolls, experiment with more yeast in your basic recipe. I've used up to 5 tablespoons.
Here's what I do: spritz the entire face of the bread with olive oil, sprinkle with chopped pecans, cinnamon, finely ground coconut and organic raisins. You can try applesauce, chopped bananas, maple syrup, etc. This bread is so good for you, I don't mind a simple sugar frosting. In our household, we drizzle fresh cinnamon rolls with maple syrup and by pass the traditional sugar coating. Roll up the dough and then use scissors or dental floss to cut the dough into traditional cinnamon rolls. Place them ¼ to ½ inches apart in a prepared pan and bake for 15 to 20 minutes.
FOCACCIA BREAD, simply roll dough out into a rectangle shape.(10 by 14 inches) I use a jelly roll stone and spread the dough out with a roller. I let the dough rise and then spritz it with olive oil and follow with Italian herbs or a Rosemary herb blend. We serve Focaccia bread with marinara sauce (spaghetti sauce) and a salad. Very easy and very yummy! This bread is also great dipped in an olive oil/balsamic vinegar/Italian seasoning mixture. Try kneading dried tomato bits, chopped onions & garlic into this dough before you roll it out.
BREAD STICKS/PRETZELS/CINNAMON TWISTS, take 1/6th of the dough and make it into a circle. Cut the circle into 8th and each piece can become a bread stick. Simply use your hands to roll the dough into long pieces. Place the dough on a prepared pan or cookie sheet, spritz with olive oil and your favorite seasonings(for pretzels, dip the pretzel in a large bowl of water and then add coarse salt) and bake for 10 to 15 minutes. You may want to lightly knead spices into the bread and then shape them for bread sticks. Cinnamon Twists are just bread sticks that have been rolled in olive oil or maple syrup and then in a mixture of cinnamon and sugar, then twisted and placed on a prepared baking sheet. Keep in mind, these products will need less cooking time. Probably 12 to 15 minutes.
DINNER ROLLS, again, taking 1/6th of the dough, form the dough into a circle and then cut it into 8ths. Each 8th makes a large dinner roll. Place dinner rolls about ¼ to ½ inch apart in your prepared pan.
THREE BALL DINNER ROLLS, 1/6 divided into 8 equal portions. Each portion is then divided into three equal parts. Roll the parts to form small balls and then place three balls into each muffin space.
PIZZA CRUST, using 1/6th of your dough, spread the dough onto a pizza stone as thin as you like, prick and bake for 15 to 20 minutes. If you like soft crust, let the dough rise and then bake. If you want crispy crust, do not let the dough rise, prick it and then bake immediately.
STICKY BALLS/MONKEY BREAD, Use a round cake pan with 2 to 3 tablespoons of olive oil in the bottom of the pan. Add honey or maple syrup and pecans or walnuts. Sprinkle with cinnamon. Gently knead raisins into the dough and roll dough into 1" balls and fill the pan with the balls touching. Let it rise and then bake. Turn pan upside down on a platter to serve. Variation: roll each dough ball in a maple syrup mixture and then roll the wet dough in a mixture of cinnamon, finely ground coconut, raisins, and nuts and then place in the pan, prepared with olive oil and syrup as previously instructed. Cooking time may be longer depending on the amount of moist ingredients.
BRAIDED BREADS, these are so fun and beautiful. Divide 1/6 of the dough into three equal pieces. Roll the pieces into long strands and braid your bread. Or, divide the 1/6 of dough into two equal parts, roll the pieces out, into a 4 by 12 inch rectangles. Place spices, veggies and marinara sauce down the middle of each strip. Fold each strip in half and seal the edge. Now you have two long, sealed, stuffed breads. Twist the strands together and you now have a beautiful stuffed bread. Try sweet ingredients, too. Cinnamon, pumpkin, raisins, nuts, dried cranberries, etc.
BURGER BUNS, Divide 1/6 of your dough into 4 equal parts. Shape into the form of traditional burgers. Rise, bake, cool and cut in half. Press sesame seeds on top if you like.
Use your imagination! Go to your local library for illustrated bread books!
RISING THE DOUGH
Cover and let rise until double in a warm draft-free place. This should take anywhere from 20-40 minutes. Or, preheat your oven, turn it off and place loaves in the warm oven.
If desired, brush olive oil on your loaves for a brown crust. Sprinkle with oat, rye, or whole grain flakes. Sesame or poppy seeds work well too. This makes a beautiful presentation and the flakes or seeds add a delicious 'toasted' flavor to the bread.
RISEN DOUGH READY TO BAKE
Bake at 350 degrees. Rolls, 20-25 minutes. Loaf bread, 25-35 minutes. Many ovens vary on temperature, if you are not sure, buy an oven thermometer to check your oven's exact temperature. Another surefire way to tell if your bread is done is to stick it with an instant-read thermometer. It should read 200 degrees.
Fresh from the oven, your bread is ready to eat. The whole process takes approximately 1 ½ hours!
Almost every time I make my bread, I freeze dinner rolls prior to rising. I simply shape the rolls and place them on an ovensafe dinner plate and put them in the freezer. When I am ready for fresh from the oven bread, I take the plate out of the freezer, let the rolls thaw and rise and then bake them. Delicious and very convenient. If you need the dough to thaw quickly, preheat your oven, turn it off and then put the dough in the oven to warm and rise.
When we are hungry for pizza, we will thaw the same dinner rolls, roll them into individual round pizza crusts, bake them and then add our favorite toppings! You can freeze this dough in its many forms and you will always have a variety of choices on hand. This bread also freezes well after it has baked and cooled completely.
Want hot cinnamon rolls on Saturday morning? If you are baking Friday night and want fresh rolls the next morning, simply make the cinnamon rolls and then put them, covered, in the refrigerator to slowly rise overnight. Take them out in the morning, let them warm up and complete the rising process and then bake!
Whole Wheat and Seeds Bread
(My Absolute Favorite High Fiber Bread Recipe-I Make All Of The Various Bread Forms With This Super Healthy Recipe)
10 cups of wheat berries
1 cup of barley
1 cup of brown rice
1 cup flaxseeds (ground in blender or coffee grinder)
1 cup sesame seeds (ground in blender or coffee grinder)
6 cups of hot tap water (if you like sour dough, use 5 cups of hot water and 1 cup of sourdough starter liquid)
1 cup olive oil
1 cup honey
3 Tlb. Saf yeast
2 Tlb. Salt (more if you want)
Grind wheat berries, barley and rice in Mill. Grind flaxseeds and sesame seeds in the blender attachment. Dump the seeds into the mixer and then fill the blender attachment with 6 cups of hot tap water. Add 10 cups of freshly ground wheat flour. Add olive oil and honey and yeast. Turn mixer to speed 1 for about 1 minute or less until mixed. Then put the plastic lids on the mixer and set a timer for 10 minutes. Let the mixture sit and "sponge." After sponging, run the mixture on speed 1 and add the salt and remaining flour until the dough just begins to clear the sides of the bowl. Set your timer for 5 minutes and let the mixer knead the dough. After 5 minutes, let the dough sit for about 2 or 3 minutes. . .if the dough is not sticky and looks smooth, you are ready to dump the dough onto an oiled counter top. Oil your hands, shape the dough into a big ball and then cut it into 6 equal pieces. For nutty bread, throw in 1 cup of raw sesame seeds.
Replace wheat with Spelt if you wish, or do a half wheat, half spelt mixture.
HAND KNEADING (IN CASE YOU DON'T HAVE A KITCHEN CENTER. . .YET!)
Denise's Honey Whole Wheat Bread:
Have on hand: 2 1/2# (9-10 cups of flour) of freshly milled hard Montana Spring whole wheat flour (order through the Co-op)
In large mixing bowl place:
3 cups hot water (115-125 degrees)
1/3 cup honey
1/3 cup olive, sunflower, safflower or oil of choice
5 cups of the flour
1 1/2 Tablespoons SAF instant yeast1 Tablespoon dough enhancer (optional, gives a lighter and fluffier texture)
Mix above with a large wooden spoon and then cover and let set until double in size and bubbly. This is called a sponge and will take approximately 15-30 minutes. Then add:
1 T. salt(I use Realsalt™)
And add enough of the remaining flour until it cleans the sides of the bowl. Touch the dough to see if it needs more flour. If it is real wet and sticky, add a bit more flour until it is no longer wet. You want to achieve a smooth and satiny feel to the dough. Don't add too much flour or you will create a heavy loaf.
To begin the process of hand kneading, you should have a large mass of dough in front of you on the countertop that feels moist to the touch but not 'sticky'. Start by pushing away and pulling forward the dough and then give it a ¼ turn and push and pull again. Continue this process until the dough is smooth and satiny feeling. It should feel rather 'light and springy' to the touch. This could take anywhere from 10-30 minutes depending on the recipe and how vigorous a kneader you are! When you are pushing and pulling, be sure to pull the dough up and over from front to back and back to front. See directions for heavy-duty mixer kneading above for shaping and baking.
TIPS & TECHNIQUES
The Ultra Mill is the most economical mill on the market. If you are interested in "mega" baking (more than 20 cups of flour at a time) you may want to order another mill. Please email Monica@YourHealthSource.Org for information on other types of mills.
First and foremost be sure that your ingredients are fresh and at room temperature. Cold flour that may have been stored in the freezer should be brought to room temperature. Ultimately, your flour should be ground fresh for the maximum amount of nutrition and flavor! (I keep frozen flour or bread for no longer than 1 month)
Ingredients for Great Bread:
" Extra Virgin, first cold pressed Olive Oil (not heat treated, not "extra light tasting" olive oil)
" Raw, unfiltered, local honey or 100% maple syrup (you can substitute other forms of sweetener)
" SAF professional yeast, needs no "proofing" In other words, you don't have to check it. . .it is consistently good. Store your yeast in a sealed container in the refrigerator or freezer.
" Hot water 115 to 120 degrees
" Freshly milled, high quality grain(need high protein content)
" Real Salt™ or Sea Salt
(Remember to use a variety of grains rather than the same grains over and over.)
Wheat conversions:
1 cup uncooked wheat = 2 cups cooked wheat
2 cups whole wheat = 3 cups ground flour
1 lb whole wheat = 24/4 cups wheat berries
Fresh milled flour starts to oxidize immediately and studies have shown that within a few days it can be completely rancid. I use high-gluten hard spring wheat from Montana to get the highest rising bread possible. Extra virgin olive oil or cold-pressed safflower or sunflower are the best oils to use for maximum freshness. Raw honey contains the most nutrients and helps to keep the bread fresher longer. Salt should be unprocessed sea salt or I prefer to use RealSalt™ because it is naturally mined from the earth and contains minerals. Most salts(including many sea salts) are heat treated and contain free flowing agents such as aluminum or sugar to keep them flowing smoothly. Realsalt is not heat treated.
I do most of my baking with SAF instant yeast. It's a professional baker's yeast that needs no proofing. Proofing is when you add the yeast directly to the water with a pinch of sugar to see if it's still alive. You can add the SAF yeast directly to the flour instead of proofing it in the liquid. Because it is a highly potent yeast, you use about 1/4 less of it than regular yeast.
As for baking pans, I use stoneware or glass baking pans. Stainless Steel pans are a wonderful choice, as well. Brushing the pan with olive oil works to keep the loaves falling right out of the pans. I do not use pan sprays because they have propellants and are not the best for the environment or for baking stones. Instead, make your own by adding 2 tsp to 2 cups olive oil. This will make your breads fall out of the pan everytime!
THINGS TO KEEP IN MIND WHEN USING AN ELECTRIC MIXER:
1. Be careful not to add too much flour! In the beginning this is very tempting and easy to do but in the end, you will wind up with a very heavy loaf.
2. Do not be tempted to over-knead. Because these machines are extremely powerful, it's very easy to over-knead the dough. If the dough goes from soft to stretchy to big globs that break apart in your hand, then you have most likely over-kneaded the dough. Usually anything over 10 minutes will do this. Be sure to perform the gluten test after about 5-7 minutes of kneading to prevent this from happening. (See below for proper gluten development information) Speed 1 on the Bosch™ Universal is sufficient for bread kneading.
If the dough feels heavy and just breaks apart and is not stretchy, then you must continue to knead a little longer. However, this can also happen if you have overkneaded the dough...it will go from soft and stretchy to heavy and sticky.
You will know this immediately if the dough goes from cleaning the sides of the electric mixer bowl to being very sticky on the sides of the bowl no matter how much more flour you add. Do not worry about over-kneading by hand, it would be very hard to do.
3. Usually Kneading on the lowest speed is sufficient for kneading bread. The higher speeds are most often reserved for using the blender or attachments.
CHECKING FOR PROPER GLUTEN DEVELOPMENT
Proper gluten development is important for a high-rising loaf of bread. It's formed when the protein part of the wheat is kneaded and it becomes stretchy and elongated. The carbon dioxide gas that is formed by the yeast is trapped in the gluten web thus causing the dough to rise. After kneading the dough into a soft and smooth consistency, it should feel rather "stretchy" but not "sticky." This will take anywhere from 3-10 minutes in an electric mixer to 10-20 minutes by hand.




Hi. I found your blog from the WFMW links @ the Rocks in my Dryer blog. I love the Master Grocery List idea. I saved your copy and plan to edit to what we normally buy. I am picturing this on the side of my fridge and I can check things as I see we need them. Is that how you do yours?